Saturday, December 1, 2018

What Happened to November?

   I cannot believe I have not posted since October. I guess I was super busy with preparing for the Christmas Fair that I have been resting and Christmas shopping since the first of November. Time goes by too fast.
  The fair was a great success! It was well attended and we made money to help pay for our hobby fun. We plan on doing the spring Italian Heritage Fair and the Christmas one next year. We also are going to do the Windham Christmas Fair. I am working on projects now to get ahead of the game, as they say.
 
Winter Luminary
  This huge lantern made from 100 lb weight card stock is a blast to make. It sits in a base and is quite sturdy. You put a tea light inside to give it a glow. I used vellum that I put through an embossing folder. I love using materials that I have not used in awhile.

  My sisters and I got this idea from a tutorial we found on Pinterest. The gal who does it did a fantastic job . The biggest problem I had was making sure I got the top part of the lantern into the base straight. I was pretty successful. 
  
  
More lanterns
 The other picture is of the lanterns my sisters made. It is so much fun to decorate them and turn the lights off and see how they glow. Love 'em. Here is the link to the tutorial.Large Luminary Lantern

Visiting Santa


 We took the time to go with our grandchildren to the L.L. Bean winter activities where they have Santa there for photo ops. Evy would not go see him last year. This year she was braver and we got good shots of the whole family. Even Izzy was curious about him. 


My craft room at its cleanest


  I will end this post with my lastest great idea. I can have more than one. Anyway, I was tired of putting mats down to save my desk top, so I went to Lowe's and bought an acrylic sheet to size. They cut it for you free of charge. I was a happy girl. It only cost about $30.00. But I love the clean look it gives and easy to make it shine. 
  I hope to post more often now that I have break. Maybe even before Christmas!
                                    Merry Christmas and Happy New Year!


/

Sunday, October 28, 2018

October, Already!!

      I cannot believe how fast the time is going. I have been working hard on our up coming Christmas Fair that will be the first Saturday in November at the Italian Heritage Center in Portland. My sisters and I have been working super hard to get our display ready and our ideas for projects done.
Our Display

More of our display
   Here are a few pictures of our display so far. We have set up in my sister, Rochelle's home to help us have a good idea of what we want to do the night before the fair in setting up .
  We are still working on items to finish up and get placed on our table. As you can see we have been busy. It has been fun though sharing our ideas and seeing how everything looks.

     We have two tables this time which meant we had to work hard to get enough goods to fill the tables. I think we have done it.
   We have tile coasters, Advent boxes, wine cork holders, fabric angels, fabric pine cone ornaments, just to name a few things. There are lots more for people to see and think about for the upcoming Christmas.
Even More of our display
One of my favorites
  We have frame samplers which I think are really fun to make. I get alot of good ideas from Pinterest.  This "Snow" Sampler was super fun to make. I had alot of different ideas in my head, but these squares seem to work well together. My husband made a frame for this one which I painted white. It is not pictured here so you will have to come to the fair to see it totally done.
  Another framed bit of art is another idea I saw on Pinterest. It is a lighted picture. I was not sure I could do it, but the tutorial I saw was a huge help.
Love the lights.
     My husband made another frame for me which held the battery pack on the back. I have not painted this one yet, but am thinking a blue color.
  The die cuts are from Stampin Up's Night of Bethlehem die set. Love it.
  I used glue dots and foam squares to attach the die cuts to the paper. You have to be patient, but it is worth it.
Cute little guys

    The most fun I had was making these gnomes . I used socks, wooden balls, fur, and the hot glue gun to construct. No sewing. I think they are adorable.
  The easiest project was the one with a frame and Scrabble tiles. I saw this somewhere on Pinterest.  I had an old frame hanging around, so I put dark paper on the inside and added these tiles to spell, " Oh Holy Night." How easy was that. I love it. If it doesn't sell I plan on putting it on my mantle this Christmas. I love how simple it looks. Yet tells a story.
Easy to do.
   Well, I guess I need to get back to my craftroom. I am working on finishing a mini album, an altered cigar box, and making more note cards. That should keep me busy.
   I want to share some of the highlights from our granddaughter, Izzy's birthday party this past August. It was so fun to watch her enjoy her day. She is a delight.
Birthday Cake-Yum

Her own cake


Opening gifts

Trying out her toys
 Izzy is growing up too fast. Her 1st birthday has come and gone. She is walking on her own now. We just love her so much. Sometimes I wish time would slow down a little . 
  Both our granddaughters are a joy. We look forward to babysitting them any time at all. 
  Well on that happy note I hope you have a Happy Halloween.  We are trick or treating with two lovely little girls and their parents. Happy Spooking.....


Saturday, September 8, 2018

It Can't Be September Already!

  I have been so lazy keeping up with my blog. Sorry it has been since June . No excuses ...just have been so busy with having some fun this summer. Now it is over and kids are back to school.
  My sisters and I are going to do two more fairs this fall and winter, so we are getting ready for these events now.
Christmas note cards
  The note cards you see in the picture are mini cards. I bought the mini pizza boxes from Stampin Up. I decorated them with designer paper and a bow. I used stamps from Penny Black, in this picture, to make some cute little thank you notes or tags for your gifts. We are planning on selling them at the fairs.
No sew fabric ornament


  We are also making the no sew fabric ornaments that you see in the picture. I used jelly roll fabric that is 2 1/2 inches wide. You cut the fabric into 2 1/2 squares. The gal in this video does a great job explaining the directions. She wants you to buy Jingle Pops by Hoffman, but they are expensive. I just went to JoAnn's and bought their jelly rolls  which were much cheaper.  Here is the video:No Sew Fabric Ornament Tutorial   It is on Pinterest.
A Framed Sampler
    Another project I finished was my Framed Sampler. I used my Stampin Up succulent dies. I have a board on Pinterest where I have saved so many examples that help me create my ideas. It is my inspiration. I like the white frame cause it really helps the squares pop. 

Marianne Designs Mice


  These mice are too cute. I bought the Christmas accessories that go with them and the winter clothes. I will post what they look like all dressed up and ready for Christmas. 
  I hope to do some projects using them to sell at the fair. Who does not like cute mice??

For Adrianne


    This is a birthday card I made for my sister, Adrianne. Her birthday is in July. I got it to her late but I got it to her.  I love these Stampin Up pandas. Too cute. I will be using these pandas on projects for the fairs. Not sure what I will do but it could be cards like this one. I liked it that much.


Coasters


  The tiles that you can get at Home Depot are perfect for making coasters. I used designer paper and glued them on with Mod Podge. Once dry I sprayed them with an acrylic sealer. You should do two or three coats. I put cork squares on the back that I bought from an Etsy store for 10.00 for 30 squares with adhesive backing. I thought that was pretty reasonable. 
  My sisters and I have made more with different types of paper and we also are stampin them, too. 
  Well, I guess I have to make dinner now. I will leave you with a few pictures of my busy summer. 
Swimming in my sister, Rochelle's pool

Cindy's French shower

Going to the beach with family

Shopping in Kennebunk

Yarmouth Clam Festival

My niece, Cindy's French bridal shower invites

Evy checking her fairy garden.
Playing with Izzy


Evy's field trip to Smiling Hill Farms


                                                               What a busy summer!

Tuesday, June 26, 2018

Craft Fair Fun!

What fun we had at the  recent craft fair in Portland, Maine. We had a table at the Italain Heritage Craft Fair. Everyone was so nice and helpful. This was true of staff at the Center staff
, fellow crafters, and customers.   This was our first craft fair and we felt pretty happy with the results. Thanks to everyone who dropped by to say hello and check out our table. It was alot of fun for us.
Just a peek at our recent craft fair table. 


  Now that we have one craft fair under our belt we are looking ahead to the Christmas Craft Fair season. Hoping to get into at least one or maybe two fairs. We are taking it easy for the month of June.
  However, I am working on some fun projects that may be on our craft table. Here is a Framed Sampler that I did for fun. It is relaxing for me to work with combining color and design in one project.
  This frame was just hanging around, so I decided to make it into a work of art. I just love the combination of color here. The paper succulents is from the Stampin Up die. The butterfly was in my stash, as was the pink flower. The sentiment is from Stampin Up, too. I used white chipboard for the backing and added the cardstock colors. Pretty happy with this one. May keep it for my walls.
A Framed Sampler
  This is a card I made for the craft fair that did not sell.
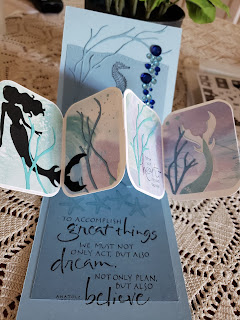
Mermaids are in....
I  really love how it came out. I am hoping it will sell
at our next craft fair.
  I used Karen Burniston's Twisted Panel die to make
this card.
   I bought the mermaid stamp at Michael's where they have the stamps with the dies in one package. I do not remember the company's name .
Inside this Twisted Pop Panel
Stamping on tile
  The inside of this card is so cute. I got the idea to cut out the mermaid as a silhouette from a Pinterest card I saw.  Karen Burniston's die is awesome. Her video on how to put it all together is so easy to follow. I have done this card manually but it did not always come out right. This is perfect every time if you use her tips and tricks.
  A new project for me is stamping on tiles. This is my first attempt using Stampin Up's High Tide stamp set. I love this stamp set. It is so versatile. I plan on using is on alot of the projects I am planning. I used an archival ink .You have to let it dry for a couple of hours or more. Most sites say to use Modge Podge and/ or then use a clear coat spray. Not sure what I am going to do next. Still waiting for it to dry.
  I will then make it into a coaster with cork on the back. Love doing new things with my stamps.
  Well, I am  not out of the boot you say in  my last post. I am wearing a compression sock and sneakers. My foot is still swelling after a time of walking so I am careful how much I am doing. But it is so nice to be walking normally.
  We are back to babysitting on Fridays for our grandchildren. Missed doing that while I was laid up. They are growing so fast. I will leave you with a picture of them with their mother.
Love this picture of the  'Girls".

Tuesday, May 15, 2018

Working Like a Dog!

Covered notepads
  My sister's and I have been wicked busy making items for the upcoming Italian Heritage Center Fair on June 9th and 10th in Portland, Maine.
  I just finished these folio like notepad covers. I used Graphic 45 paper. A small magnet closes the front. I made about 5 of these.
  This is our first craft fair so we really aren't sure what people are looking for in paper crafts.


Mickey Mouse birthday card
   This card was so fun to make since I am a Disney person. I have some Mickey paper in my stash. I also used a die cut I bought in Florida of the fairy godmother.  I will have to look to see who makes this die cut.

For Aunt Linda


   In the midst of all this fun work, I had to make a sympathy card for my Aunt Linda. My Uncle Myron passed away. He was my mother's brother and was the nicest man. He struggled with diabetes for years. I shall miss thinking of him in Small Point taking care of Head Beach and his campgrounds.


Add caption


   I started making these block cards. I had not made these before . They are super easy and so cute. I made this one to sell for a boy. The little boy stamps are from Stampin Up. The paper is from Graphic 45. I used the little picture of a baby from this collection.
   These cards fold flat so they can fit into an envelope. If you think you would like to make one, here is the link to the tutorial:
Block Step Card Tutorial

  I made a baby girl one out of pink paper with about the same idea for embellishments.


Add caption


Add caption
   My dear husband has been helping us with displays for our craft table. He made these two card holders to set on the top of the table. They are perfect for our specialty cards. He also made a book case that holds our card in the box cards and other box like cards. Our table is going to look awesome.
  Once we have finished setting it up, I will post pictures. Thanks, Dear!!


In the boot

  Up date on my foot surgery. The doctor said I was doing really well and put me in a walking boot. I have about one more week and then I can get rid of the knee walker and just use the boot. Two weeks after that I can use a shoe.. Amen!
  It has been alot harder than I thought it would be. Your feet are very important to have healthy. I miss working in my garden, but will be out there pulling weeds soon.
  Happy Spring!


Friday, April 27, 2018

Feeling Better!


      It has been awhile since my last post due to bunion surgery I had in March.
The surgery went well but the recovery is forever. I am in a cast and I have discovered that I do not like not being able to do for myself. My husband has been great. I  think he misses the old me though. I even miss cleaning house, believe it or not.
Spring colors
   I have been busy with  my paper crafting once I was able to
get around on my knee walker better. My hobby has kept
my sanity during these last weeks. I am so thankful for that.
For Elaine... 
  I made a birthday card for my girlfriend, Elaine, before my surgery thank goodness. I really like how it came out. I was inspired by a card I saw on Pinterest.
Double Z card from a different angle
   The Happy Birthday die is from Elizabeth Crafts, I believe. I made the flame for the candles from Stampin Up's bird punch. I love how it folds flat so you can put it in an envelope and send it , if  you want. I handed it to her where we craft together once a week. I embossed the background with a folder I have. Not sure which one, but can check it out if you are curious.
  My sisters and I have decided to set up a table at the Italian Heritage Fair in Portland on June 8th and 9th. We are hoping to just make money to help pay for all the fun materials we have purchased this year and to meet some fellow crafters. We are excited.
   That is why I have been working so hard on making items to sell.
Again, this has helped me get through these difficult weeks thinking about our sale  table.
The front

   These cute treat boxes hold candy and you can put a gift card in the top, too. It is very simple when you follow the video. I made one a Father's Day treat box and the other is a birthday one. Here is the video on Youtube, if you are interested in making these on your own.Treat Box and Gift Card holder
The back
    I bought the Elizabeth Crafts frame die. It is the smaller sized one . There is another one that is larger and more expensive. I love it cause it is so
Love this new die.
easy to use. I made this black frame and decorated it with snowflakes and used white enamel for snow drops/ 
   The picture is a Penny Black stamp called Dressed in Snow. It is so pretty. I watched a video to help me use the inks and masks to make it look good. Love how it came out and it was my first try. Here is a link to that video on Youtube by Penny Black. She does a great job on her tutorials. Dressed in Snow
  
Add caption
 This is the name of our endeavor on our business cards. We hope to have them on our craft table ready to hand out for people to get to know us. We purchased them from Vistaprint. Great people to deal with online.
Center Stage Scene Card

Our Logo 
   Today I am working on our Logo. I need to make it black and white in order to have someone make it into a stamp we can use on our sale items.
   I also plan on making a sign to go over the top of our table for people to see using this graphic of us: Sisters' Designs.


 Here are a few more cards I have finished for the Fair. The beach themed birthday card took me a little time because there are so many elements to it. I love how it all folds down flat for mailing.
  The dragon cards are so cute and wicked easy to make. I found my inspiration on Pinterest.

I have more pictures of our projects and all but my foot is bothering me so I guess I will save it for my next post. I will not wait so long in between posts this time.
  The weather is improving here. I miss walking around my gardens. I think it may be another two or three weeks before I get  walking boot. Can not wait. We are anxious to babysit for our granddaughters again.
Happy Spring!

Getting Ready!!

    I have been getting ready for an upcoming craft fair at USM on April 22nd. My sisters and I are excited about doing a spring fair. We di...